Friday 30 November 2012

Kicking Off the Season: Old Fashioned Apple Pie


This is the season of eating. Yes, Thanksgiving is America's big day-to-get-together-with-people-you-love-and-stuff-your-faces, but really the whole Autumn-Winter season is all about cuddling up and munching on something tasty and comforting. Or at least it should be.

This is the season of fragrant spices and toasty firesides; twinkling lights to combat the early darkness and cozy sweaters to ward of the cold. It's about comfort. And what's more comforting than delicious food?


As the days get ever colder and shorter, I find myself very glad to be home, snuggled up with familiar things and free range to mess around in the kitchen. I got back home just in time for Thanksgiving after a couple months of travel. I ate delicious food in new places, I worked on a farm, feeding pigs (my absolute favorite farm animal!), I absorbed the various cultures of about half a dozen cities, and I got to spend two months with my boyfriend who lives very far away. But, despite all the fun and excitement of these adventures, there's something supremely comforting about being home for the cold weather, the cinnamon-laced cooking, and the holidays.

I actually did a surprising amount of cooking during my travels, even experienced some culinary firsts (first time baking crusty bread, first time cooking with lard) but that only made me more eager to get home and fine-tune these experiments in my home kitchen.


So, here's my kicking-off-the-holiday-season-in-my-blog-world recipe. Something delicious and comforting and spiced with the flavors of fall. Apples, cinnamon, and butter. Obviously.


It's another pie. Something fairly simple and traditional but which I'm still working on perfecting. Word on the street is that the best fat for pie dough is a 2/3 butter, 1/3 lard combo, so I've been giving it a go. Honestly, though the crust does get a little flakier with the addition of lard, what I notice most is a taste difference. Although I love the creamy taste of butter as much as the next person, the savory element introduced by the lard is much more subtle and interesting, a more delicate kind of delicious.


Pie Crust:
(this makes a double crust, halve the ingredients for a single crust)

3 cups all-purpose/plain flour
1 teaspoon salt
1 teaspoon sugar
2/3 cup unsalted butter (1 1/3 sticks, 150 grams)
1/3 cup lard (50 grams)
8-10 tablespoons cold water


Whisk together the flour, salt, and sugar. Cut in the butter and lard and mix into the flour mixture with a knife, pastry cutter, or your finger tips. When the mixture has the consistency of very course sand with a few larger, pea-sized lumps of butter, start adding the water, a couple tablespoons at a time. Gently mix the water in with a fork until the dough will hold together when lightly squeezed into a ball. It should still be fairly crumbly but will come together more when you let it rest in the fridge.

Divide the dough in half and gently shape each half into a disk (trying not to handle them too much, as over-working the dough results in a tough crust) and wrap in cling film. Refrigerate the disks for at least an hour before rolling them out. This lets them re-harden after being handled and allowed the moisture to draw the dough together a little more.

Preheat your oven to 375º F (191º C).

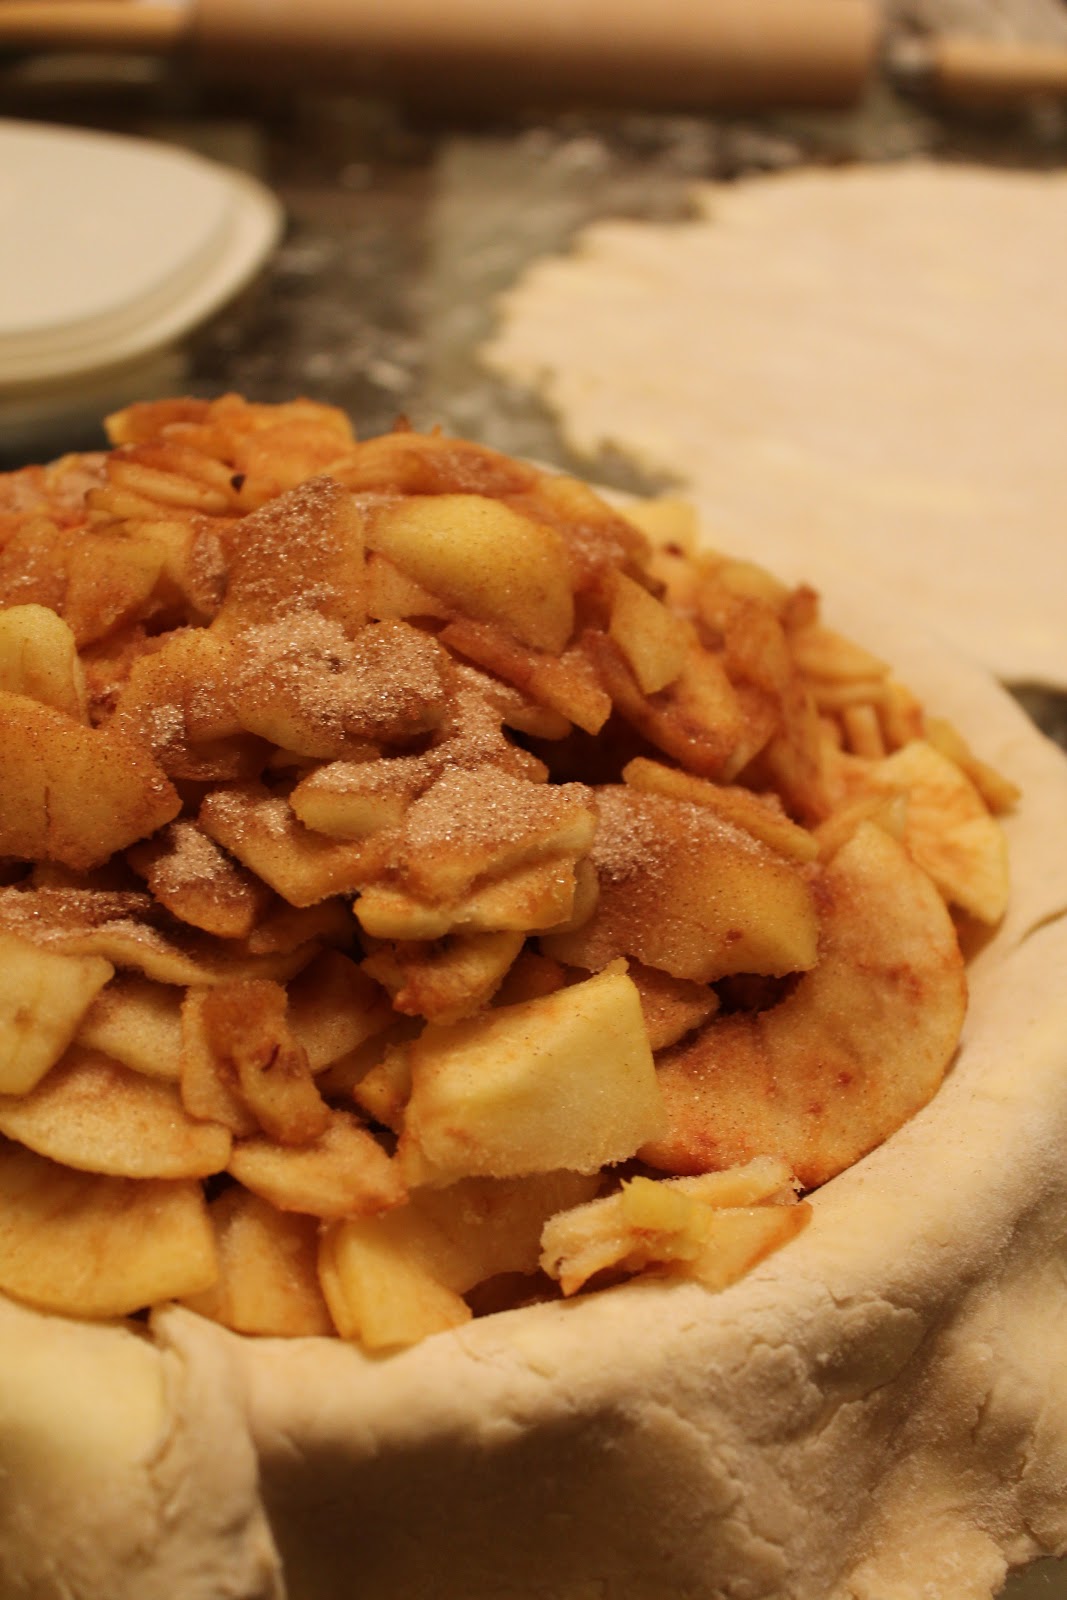
When you are ready to construct the pie, take one dough disk out of the fridge and roll it out on a floured surface. Use a floured rolling pin and add more flour as needed while rolling so that the dough doesn't stick to the work surface or your rolling pin. When the dough is rolled out to about 1/4" thickness, gently fold it in half, lift it into your pie pan, and unfold it.

Filling:
2 lbs apples (cored and thinly sliced)
2 tablespoons sugar
1/2 teaspoon cinnamon
pinch of salt

Whisk together the sugar, cinnamon, salt until thoroughly blended. Begin layering the apple slices in the bottom crust. Lay down one layer and sprinkle with the cinnamon sugar mixture and repeat until all the apple is piled in the crust. Dome the apple filling in the center slightly (this should sink somewhat during the baking).

Now roll out the second dough disk and lift that on top of your filled bottom crust. Trim the overhang of the two crusts and press them lightly together. If you want, you can crimp the crust using your forefingers and thumbs (I always think that adds a nice finishing touch!)


Before baking, make sure you cut some slits into the top crust so that steam can escape. You can also brush the top with a little milk or an egg wash or use the extra dough to make some decorations. I sprinkled mine with some Demerara sugar for extra prettiness!

Cover the pie with foil and bake at 375º F (191º C) for 20 minutes. Then remove the foil and reduce the heat to 350º F (177º C) and bake for an additional 40-50 minutes, until the crust is lightly browned. Once it is done baking, remove the pie to a cooling rack until it's no longer dangerously hot and then tuck in!

Thursday 23 August 2012

Summer Bounty: Plum and Nectarine Pie


Sometimes stone fruit is a dream. You can slice cleanly into that juicy, fragrant flesh. It pulls smoothly away from the hard pit. The firm flesh holds the sweetness, complemented perfectly by the slight tartness of the skin.


But other times it's a nightmare. Soft fruit squelches unresistingly under the knife's edge. Errant sprays of juice squirt you in the eye. Soft skin tears and peels away from the flesh and the hard pit refuses to give up its grip on the succulent fruit.

This was one of those times...

But that's okay. Sometimes baking is a little messy. Sometimes things don't keep the shape you intended them to. You might end up with sticky fruit juice up to your elbows and a smudge of flour on your nose. And that's just fine.


This pie is like a good summer: satisfying, sweet, and a little bit messy. The pastry is buttery-flaky deliciousness and the filling is soft and full of fragrant plum and sweet nectarine.

Recipe:
Plum and Nectarine Pie

Pastry:
2 1/2 cups all purpose/plain flour
1 teaspoon salt
1 teaspoon sugar
1 cup COLD butter, cubed (two sticks or 225 g)
6-8 tablespoons cold water

Combine the flour salt and sugar. Now add the cubed butter, cutting it into the flour with a knife or a pastry blender (or pulse it in a food processor) until it has the texture of very course sand with some pea-sized lumps of butter (don't over mix it or your pastry will be tough!) Now begin adding the water, a little at a time, and lightly mix it in with a fork. Add just enough water so that the dough will hold together when pressed into a ball.

Now turn the dough onto a lightly floured surface and divide it in two (these will be your top and bottom crusts). Use your hands to lightly shape the two halves into rough disks. Wrap each disk in cling wrap and refrigerate them for at least an hour but no more than two days.

Filling:
5 nectarines
5 small plums
1/2 cups sugar
1 teaspoon vanilla
3 tablespoons flour


Thinly slice the fruit and toss together with the other ingredients.

Once your dough has chilled for at least an hour, preheat the oven to 375° F (190° C). Lightly flour your dough-rolling surface and remove one disk from the refrigerator (the other one can stay in until you're ready to roll it out and top the pie with it). Working quickly and smoothly to avoid over-working the dough, roll it out to a thickness of no more than 1/4" and at least 2 inches wider than the diameter of your pie tin. Gently lift the sheet into your pie tin (you can roll it onto the rolling pin to move it or carefully fold it in half, lift it onto the tin, and unfold it again). Trim the excess dough, leaving between 1/2 and 1 inch of overhang.

Now spoon the filling into the crust and repeat the process with the top crust. You can fold the edges of the top crust over the bottom and flute them. If you have extra scraps of dough you can cut out decorative designs to place on top (brush the bottom of each addition with a little milk before placing it on so that it will stick during baking).


Brush the top of the pie with a little milk or eggwash so it will brown nicely in the oven and you can sprinkle it with a little demerara sugar.

Cover with foil and bake in the preheated oven for 20 minutes. Then remove the foil and bake for an additonal 25-35 minutes, until the crust is lightly browned.


Friday 10 August 2012

Banana Muffins with Streusel Topping


Did you have food obsessions as a child? I remember being addicted to carrots for a while. And I couldn't get enough of cucumber. And bananas. I definitely a special place in my heart for bananas. I loved the way they came with a natural wrapper. I loved peeling them, one section at a time. I loved the smooth, firm texture. I just hated how fast they turned brown. Sometimes after just a couple of days in the fruit bowl, brown spots would already start showing up. Somehow, as a child very fond of the familiar, I couldn't accept the change in appearance and flavor as my favorite fruits began to age. That slightly heady sweetness and steady softening repulsed me.

But things are a little different now.


Eating raw, browned bananas still isn't my favorite activity (some impressions just don't go away!) but I now know the secret joy that only over-ripe bananas can bestow. Banana bread. Banana muffins. Moist, sweet, and so, so delicious. The squishy, sickly sweetness of brown bananas elevates the humble muffin or loaf cake to glorious, scrumptious heights. And I don't have to feel bad about letting those bananas go steadily browner, uneaten on the counter.


Recipe:
Banana Muffins with Streusel Topping

1 3/4 cups all-purpose/plain flour
1 teaspoon baking powder
1/4 teaspoon baking soda
1/2 teaspoon salt
1 teaspoon cinnamon
1/2 cup (1 stick or 113 grams) butter, softened
1/2 cup brown sugar (if you like your goodies sweet, go ahead and add 3/4 cup!)
3 large, very ripe bananas, mashed (I left mine pretty chunky so there were globs of banana in the muffins when they were cooked, yum!)
2 large eggs
1 teaspoon vanilla


Preheat oven to 350° F (180° C)

Whisk together flour, baking powder, baking soda, salt, and cinnamon and set aside.

In a large bowl, cream together the butter and sugar. Stir in the bananas and then the eggs and vanilla.

Add the flour mixture, a little at a time, stirring until just combine (don't over mix).

Spoon batter into greased muffin tins, about 3/4 full.

Top with streusel topping (see this recipe)


Bake in preheated oven for about 25 minutes.

Allow muffins to cool in tins before removing to a cooling rack.


Saturday 4 August 2012

Almond Cake with Tart Raspberry Sauce


When I eat chocolate ice cream, I want it to taste like chocolate. When I have lemonade, I expect the taste of lemons. In my opinion, there are few things more disappointing than biting into a slice of almond cake, anticipating the aromatic, comforting taste of almonds, and discovering that's it's just a vanilla cake. With some sliced almonds on top. That is not an almond cake, whatever the recipe might say.

But this, this is definitely not that cake.


David Lebovitz's almond cake is sweet, moist, and buttery, full of the heady flavor of almonds. The flavors really come into their own as the cake sits, so it's even better after a day or two. This is a proper almond cake.

The tartness of the raspberry sauce perfects complements the sweetness of the cake but definitely isn't necessary. This cake is pretty fabulous on its own.


Recipe:
Almond Cake with Tart Raspberry Sauce
recipe from David Lebovitz


1 1/3 cups sugar
8 oz almond paste (not marzipan which is sweeter)
1 cup flour

1 1/2 teaspoons baking powder
1 teaspoon salt

1 cup butter, softened (2 sticks, 225 grams)
1 teaspoon vanilla extract
1 teaspoon almond extract
6 eggs


Preheat the oven to 325° F (162° C)


Grease and flour a 9 or 10 inch cake pan with sides at least 2 inches high (because the case rises during baking so a shorter, layer pan might not contain it). I used a springform pan, which made the cake much easier to remove after baking.


In a food processor, pulse together the sugar, almond paste, 1/4 of the flour until clumps of almond paste have broken up and the mix has the consistency of very course sand. I used a powerful blender (due to a lack of food processor) and mixed together small amounts at a time. It took quite a bit of time because I had to keep scraping sugary almond mixture off the blades so a food processor is a better bet (but not the only option).


In a separate bowl, whisk together the rest of the flour (3/4 cups) with the baking powder and salt. Set aside.


Tip the almond-sugar mix into another bowl and mix in the softened butter until smooth (mixing well will ensure that the almond paste is even more thoroughly combined). Next add the vanilla and almond extracts and then the eggs, one at a time.


Once the mixture is fully combined, begin adding the flour mixture, stirring until just combined.


Pour the batter into prepared pan and bake in preheated oven for about 65 minutes. The top of the cake should be a dark golden brown.


Allow the cake to cool in the pan before removing.


Raspberry Sauce:


1 pint fresh raspberries
3 tablespoons water
1 tablespoon brown sugar


In a small saucepan, slowly heat the water and raspberries, stirring frequently. As the berries liquefy, stir in the sugar. Turn the heat down to the lowest possible temperature and allow to simmer and thicken for about ten minutes, stirring occasionally. Remove from the heat and cool completely. Can be refrigerated for a few days once cool.


Sunday 29 July 2012

Falafel with Lemon Sesame Yoghurt


This weekend I checked some things of my culinary to-do list. First time cooking solo for a dinner party, check. First time cooking with dried beans, check. First time cooking lamb, check. So productive! Never mind that all three things were for the same meal...


The dried beans in question were chickpeas, also known as garbanzo beans (the little fellas that get mashed up to make hummus). They were reconstituted overnight and mashed up to go into falafel. Spiced chickpea patties or balls, falafel is a staple of many Middle Eastern and Mediterranean cuisines. A fabulous vegetarian dish with the heartiness and protein to substitute for meat with added points for being healthy. It can be served in burger buns, replacing the burger patty, in pita bread as a sort of sandwich, or on its own with just a little drizzle of sauce.

Either way, yum.

Recipe:
Falafel with Lemon Sesame Yoghurt


Lemon Sesame Yoghurt:
1 cup yoghurt
juice of 1/2 lemon
1/2 teaspoon toasted sesame oil


Combine ingredients in a bowl, cover, and refrigerate until ready to eat.


Falafel:
2 cups dried chickpeas (about 4 1/2 cups when cooked)
1 medium-sized onion, finely chopped
6 cloves of garlic, minced
1 fairly packed cup chopped parsley
2 1/2 teaspoons cumin
1 1/2 teaspoons ground coriander
1/2 teaspoon chili powder
1 teaspoon salt
7 tablespoons flour
3 tablespoons water

If you're using dried chickpeas, you'll have to soak them overnight. Put them in a medium sized bowl and cover with enough cold water so that they're a couple inches below the surface. Cover and let sit overnight.


The next day, drain the chickpeas (they should be a little more than double their original size) and put them in a medium saucepan filled with water. Bring to a boil and then cover and simmer for about an hour. Drain and  allow to cool. The chickpeas can be cooked ahead and stored in the fridge in an airtight container for a couple days.


Saute the onion in a little olive oil until translucent, then add the minced garlic and cook for another couple minutes. Remove pan from the heat and set aside.


In a large bowl, roughly mash the chickpeas with a potato masher or a sturdy fork (alternatively, you can use a food processor, on pulse so as not to overly mash them). There should be chunks, rather than a uniform mash, but no whole chickpeas.


Using a fork or a spoon, stir in the parsley and then the various spices. Be sure to thoroughly combine all the ingredients so that the flavoring is consistent throughout the mixture. Next, stir in the cooked onion and garlic (you might find it easier to use your hands for this part, as I did!)


Now add the flour (this binds the mix together so you can form patties) and a few tablespoons of water. You should be able to form balls of the falafel mixture without them immediately crumbling.


Cover with cling-film and refrigerate for at least half an hour. You can also do this in advance and leave in the fridge for a couple days.


To cook the falafel, heat a large saucepan and generously coat with olive oil (not so much that you're deep frying the falafel but enough to cover the whole surface of the pan). Remove the mixture from the fridge and form small patties with your hands (you might want a small bowl of water ready in case your hands get sticky!) You can make them whatever size you like (though if they're too big they're likely to fall apart), just be aware that larger patties will take longer to cook. Fry the patties for several minutes on each side, until they're a dark golden brown. If you're making several batches, you can keep them warm on a platter in the oven (turned to a low temperature!)


Serve while hot! The cooled patties will keep for a few day in fridge. You can reheat them in the microwave or the oven.

Monday 23 July 2012

Go-To Chocolate Chip Cookies


This is that chocolate chip cookie recipe. You know, the one that each home baker seems to have. The go-to, in-case-of-emergency-baking-urges recipe. The recipe you use when it's 10pm and you desperately have to bake something immediately but you don't have the mental fortitude to come up with something new. The well-worn page in a recipe journal, scattered with greasy smudges and vanilla stains. That chocolate chip cookie recipe.


My go-to recipe produces light, slightly chewy cookies. My ideal blend of soft, chewy, buttery, crunchy, and satisfyingly dense. They're my stand-by for movie nights and potlucks. They satisfy my morning, afternoon, and midnight cravings. And when it's 8 o'clock and my post-dinner sweet tooth rears its head this is the recipe I turn to.


Recipe:
Chocolate Chip Cookies
1 1/2 cups flour
1/2 teaspoon salt
1/2 teaspoon baking soda
1/2 cup (113 g or 1 stick) butter, room temperature
2/3 cup lightly packed brown sugar (I used a mix of light and dark because I didn't have enough of either!)
1 egg
1 teaspoon vanilla extract
1 cup semi-sweet chocolate chips.


Preheat the oven to 350° F (177° C)

Mix together the flour, salt, and baking soda with a whisk or fork and set aside.


Cream the butter and sugar and then add the egg and vanilla. Begin adding the dry mix to the wet, a little at a time. Be sure to thoroughly combine.


Finally, fold in the chocolate chips. Stir until they are evenly distributed throughout the cookie dough.

Spoon walnut-sized scoops of dough onto a lightly greased baking tray, spaced about 1 1/2 inches apart.

Bake for 10-15 minutes or until golden brown.

Allow to cool somewhat on the baking tray before removing to a cooling rack.

Makes about two dozen cookies.


Thursday 19 July 2012

Home-Sweet-Home: Blueberry Muffins with Streusel Topping


What's the only thing you can do when you're lazing around, recovering from jet lag and trying not to panic about the mysterious future? Make blueberry muffins, obviously. What, you don't distract yourself with comfort baking? Psh.

Well, I am 100%, bona fide moved back home. The couple boxes I had shipped even arrived today so it's official: I'm back at my parents' house. Glamorous.

As much as I do need to get a job, pronto, and sort out some genuine independence, there are definite pluses to my current living situation. For one thing, the parents have an awesome kitchen. Seriously, awesome. Also, they're pretty appreciative of being cooked for. That's always nice.


So far, I've been about as lazy as possible, cooking-wise (hey, it's a nice change to not have to produce my own meals!) But this morning I started getting a little twitchy. The I-haven't-used-an-oven-in-way-too-long-and-there-are-tons-of-ingredients sort of twitchy. Baking Time!

It needed to be something on the lighter side-- not too buttery and full of chocolate-- since this is for my parents, not some greedy college students (college has taught me that twenty-something boys really can eat all the food. All of it.) To me, lighter baking in the summer just means throwing in some fruit. That way it's healthy, see? Besides, bubbly, oozing berry juice, soaking into spongy baked goods sort of makes me swoon. And drool.


Also, there's something especially luxurious and wholesome about whipping up some tasty treats with fresh, juicy fruit and eggs from a friend's chickens. Fresh, local ingredients give you the sense of being more in touch with the food you're making (the food, ultimately, that you're putting in your body!)

So: blueberry muffins. Cinnamon crumble topping. Bubbly, juicy berries and gorgeous golden -yolked eggs. Yes.


Recipe:
Blueberry Muffins with Streusel Topping
adapted from this recipe
1 1/2 cups flour
1/2 cup sugar
2 teaspoons baking powder
1/2 teaspoon salt
1 egg
1/3 cup vegetable oil
1/3 cup milk
1 heaping cup fresh blueberries

1/3 cup flour
1/2 cup sugar
1 1/2 teaspoons cinnamon
1/4 cup butter, room temperature (1/2 stick or 57 grams)

Preheat the oven to 400° F (200° C)

Mix together the dry ingredients and the wet separately. My egg was on the small side so I added a splash more milk to make up for the loss of moisture.

In a third bowl, mix together the additional flour, sugar, cinnamon, and butter. Using your fingertips, rub the butter into the dry ingredients until it forms a rough breadcrumb-like consistency.


Blend the wet and dry muffin ingredients, stirring until just combined. Now gently fold in the blueberries (being careful not to mix too much).

Fill greased muffin cups to the top with the mixture and top with the cinnamon crumble mixture.

Bake for 20-25 minutes or until golden brown.


Let them cool in the muffin tin for a while (so the top don't tear off when you take them out!) and then remove to a cooling rack.


I got 7 hefty muffins from this recipe (let's call it 6-8!)


Sunday 15 July 2012

Moving On: A Few Goodbyes


The time has come. The end of an era. I've ended one phase of my life and, filled with terror, prepare to begin a new one. I have officially graduated from university.

I leave behind my student lifestyle. My university friends. The country I've lived in for the last three years.


Goodbye, my cluttered cupboards. Goodbye, my tiny kitchen. I'll only miss you during fits of nostalgia-fueled madness.


Thank you for the meals.

Monday 9 July 2012

Spiced Bread Pudding with Rum Butter Sauce


My unofficial taste-tester gives this bread pudding two thumbs up ("All the thumbs I am capable of giving.") Really, what more can I say?

Perhaps that this is comfort food at its warm, scrumptious finest, combined with a little thriftiness. Or that it's a great way to use up unappetizing, old bread.


Or maybe just: it has cream in it. And rum.

I've had my fair share of dry/boring/flavorless bread puddings. Dishes that clearly exist merely to use up bread that no one will eat, bringing nothing but shame to the noble name of dessert. Believe me, this is not one of those. This boozy bread pudding is moist and cinnamon-y. It tastes like cinnamon french toast doused with some very decadent syrup. It is finger-licking, bowl-scraping goodness.


I ate it straight out of the pan. And I am not ashamed.

Recipe:
Bread Pudding with Spiced Rum Sauce
2 eggs
1 cup milk
1/2 cup whipping cream
1/2 cup sugar
1 teaspoon vanilla
1 teaspoon cinnamon
4 cups cubed day-old bread (I used a mixture of leftover challah, white, and wholemeal bread)
1/2 cup raisins
2 tablespoons rum (I used Captain Morgan's Spiced but any kind will do)


In a small dish, pour the rum over the raisins and set aside to soak.

In a large bowl, mix together the eggs, milk, and cream. Add the sugar, vanilla, and cinnamon and blend thoroughly.

Add the cubed bread and rum-soaked raisins and stir until the bread is thoroughly coated. (Use a large spoon, use your hands. Embrace the goo.)

Cover the bowl and refrigerate for at least an hour to allow the bread to soak up the liquid.

Preheat the oven to 175° C (350° F).

After the bread mixture has rested for a while, tip it into a greased baking dish (I used a 9 inch cake tin but a square metal or glass baking dish works just as well) and bake for 30-35 minutes (until the top is golden brown) and then allow to cool on a cooling rack.

Serve warm, with a drizzle (or the drizzle's less elegant cousin, the slosh) of rum butter sauce or on its own.


Spiced Rum Butter Sauce
110 grams butter (1/2 cup)
1 cup brown sugar
1/2 cup whipping cream
a pinch of salt
3 tablespoons spiced rum

In a small saucepan, melt the butter and stir in the brown sugar and salt. Keep stirring until the mixture is smooth and thoroughly combined.

Pour in the cream and continue stirring to blend. Allow to simmer for a few minutes, stirring occasionally, so that the mixture thickens.

Stir in the rum and simmer for another couple minutes before removing from the heat. Allow to cool and thicken in the saucepan.

This can be made in advance and refrigerated, just wait for it to cool before putting it in a refrigerator-able container and reheat before serving.