Sunday 27 May 2012

Beating the Heat: Soft Snickerdoodles

It is one of life's cruel twists that even though a hot day is quite possibly the worst kind on which to do baking (read, raise the temperature of the whole house and make hot food), the high temperature actually makes it so much easier. Two words: creaming butter.

In the depths of winter, when my baking cravings have taken over completely, making me long to fill the chilled house with warm, wafting aromas, the dang butter has frozen solid. In my student house in which we infrequently use heating because we are poor, when I say "solid" I genuinely mean it. Just-out-of-the-freezer solid. Could-be-used-as-a-dangerous-weapon-or-building-material solid. It's a problem.

As much as I value the workout for my arm muscles, sometimes I don't want to beat my ingredients into submission, working up a sweat and feeling like Rosie the Riveter (though considerably less calm and collected). Sometimes I just want a zen-like blending experience, bringing sweet and oily together in tranquil bliss. Despite the 1950s cupcake-making-housewife stereotype, that is generally not the baking way. But. On a hot day, with a softened pat of butter and a granulated cascade of white sugar, that's exactly what I knew I'd get.


Mm, so creamy and malleable. This is the good life.

So, armed with a glass of lemon iced tea and a souvenir fan from the French Riviera (an appropriate nod to the uncharacteristically Mediterranean weather we've been having. It's May in England, for goodness sake!), I set to whipping up the most simple of sweet treats: the humble snickerdoodle.


To be honest, I've never been particular fond of these guys. Sugar cookies coated in cinnamon sugar, there's genuinely nothing not to like about them but, somehow, in my extreme youth I seem to have irrationally taken against them (as I once did with zucchini, brussels sprouts, and tea). Well, armed with some very soft butter and a hankering for cinnamon, I decided that this nonsense has to stop. I've long since left behind the age when knee-jerk dislikes are even moderately acceptable. The snickerdoodle might not be the most adventurous of culinary delights but there's certainly nothing wrong with it. Unless you don't like cinnamon. Or sugar. Or cookies, for that matter.

So here it is, simple, sweet, and deliciously soft:

Recipe:
Soft Snickerdoodles
225 grams butter
1 1/2 cups sugar
2 eggs
2 3/4 cups flour
3 teaspoons baking powder
1/4 teaspoon salt
3 teaspoons cinnamon
3 tablespoons sugar

Preheat the oven to 180º C (350º F)

Whisk together the flour, baking powder and salt and set aside. Cream together the butter and sugar until smooth. Add the eggs and combine thoroughly, until the mixture is a pale yellow. Gradually add the flour mixture, a little at a time, combining thoroughly (there's a lot of flour so this could take a while as it did for me!) The dough should be pretty stiff now (great arm workout!)


(And that spoon can be passed on to any deserving parties/kitchen hoverers in the vicinity!)

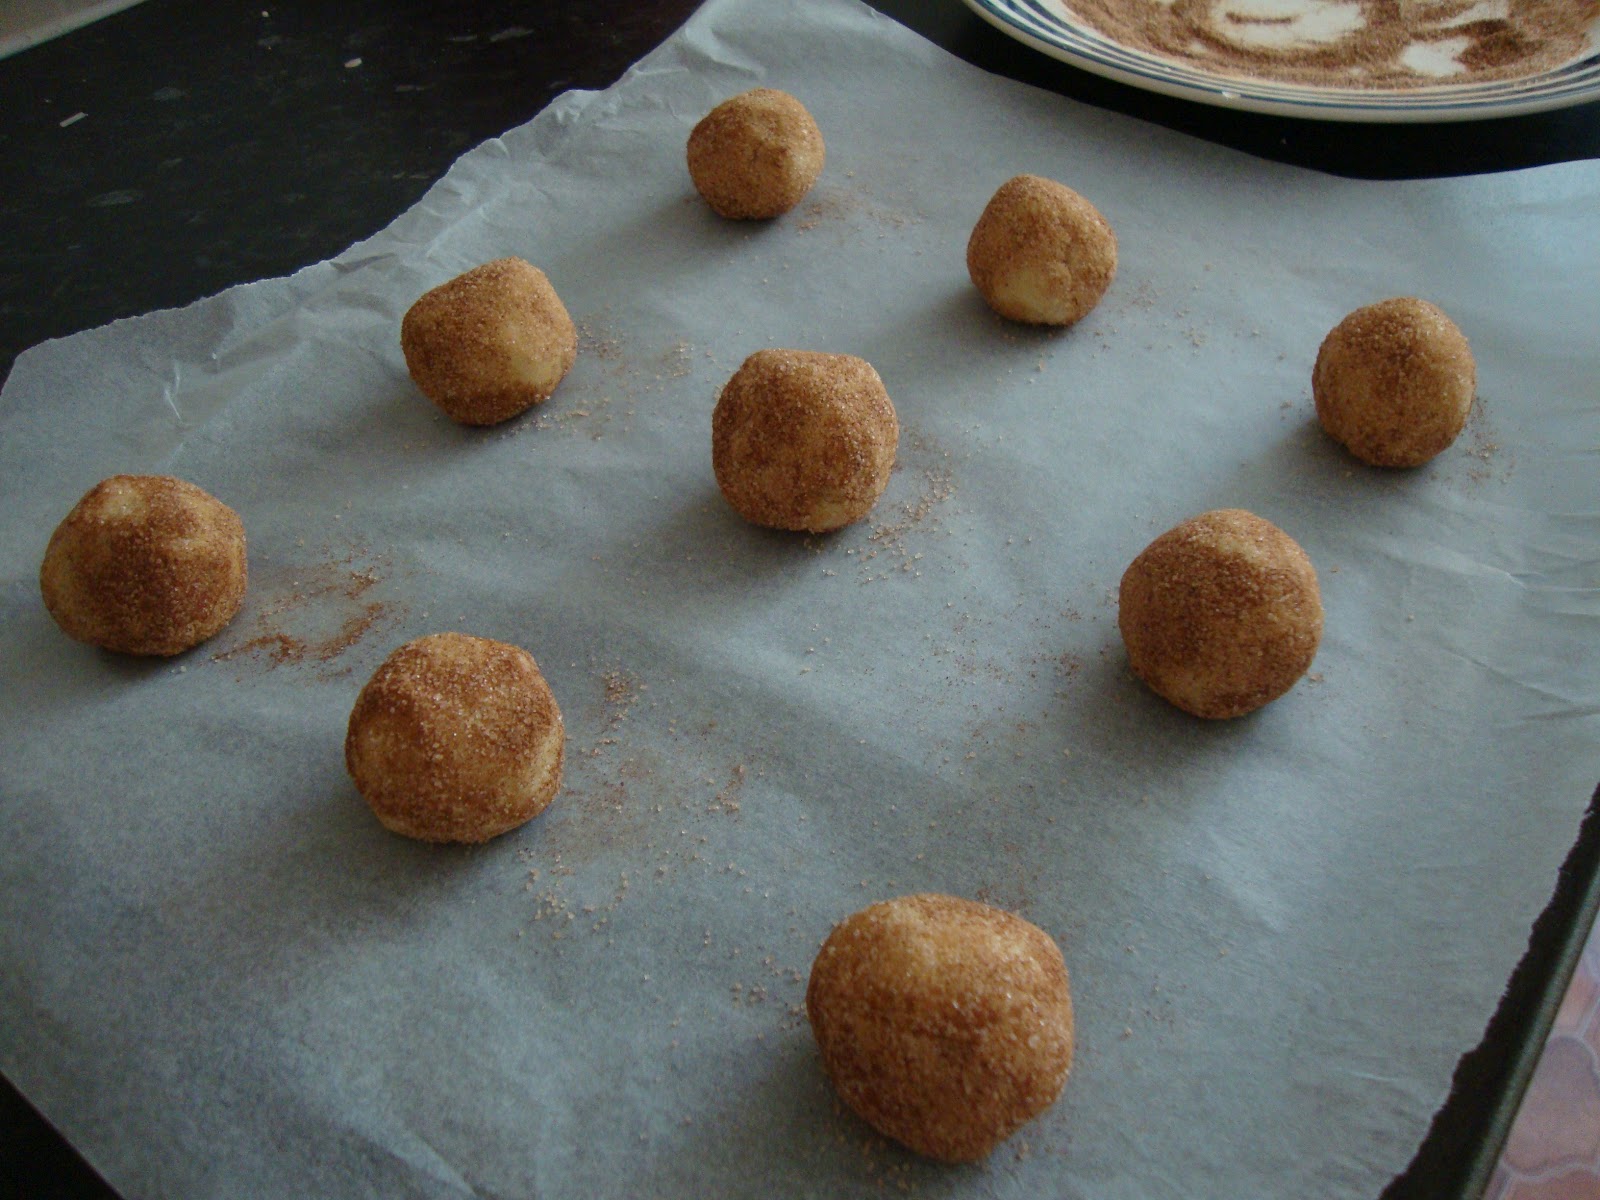
Chill the dough and the baking tray you're going to use in the fridge for about 15 minutes (it was such a hot day that I left it there for longer)

Combine the cinnamon and additional sugar on a plate for rolling the cookie dough balls in.


 Ah, that makes me think of fresh, cinnamon-y Elephant Ears. The tasty, tasty calories!


When the dough is done chilling, remove from fridge and scoop out walnut sized balls (they'll need to be spaced a couple inches apart on the baking tray) and roll each ball in the cinnamon sugar until it's thoroughly coated. Just like little sugar-dusted doughnut holes.


Bake for 10 minutes and remove immediately from the tray to a cooling rack.

I used a parchment paper-lined tray to minimize the mess (yes, cinnamon sugar will try to get everywhere) and because it makes it easier to whisk the cookies off the tray when they're done. You don't want to leave them on the hot tray too long or they'll overcook and won't be soft and chewy anymore.


When my cookies came out of the oven they were all puffed up in the middle. They were cute but I wanted a more even, flattened look so I pressed each one flat with a fork as they came out. I probably could have done that before they went in but it was actually more satisfying when they were warm and a little crispy (even if some of the edges cracked because I'm clumsy...)


I got three dozen cookies out of this recipe (oh lord, so much eating/foisting off on other people to do!) Stored in an airtight container they keep their chewy soft gloriousness


Thursday 24 May 2012

Spring has Sprung: Carrot Cake Muffins


Carrot cake is, without a doubt, my favorite type of cake. The moistness. The delicate spicing. The subtle sweetness from the carrot. Mm! When I found a recipe for carrot cupcakes I might possibly have swooned a little bit inside (in the picture they even had little sugar carrot decorations, I'm only human!) The weather has finally mustered up some glorious sunny days (positively summery!) so I decided that the time had come for something suitably fresh-tasting and seasonal. Despite what the supermarkets would have us think, carrots are actually a spring/summer veg. Besides, they're bright orange and they make me think of little bunnies with their nibbling little teeth. What could be more spring-like?

Since I'm in the mood for sharing (and would rather not eat round after round of baked goods on my own...) I decided that little bite-sized portions is the best way to go. People can just grab one without going through the ritualistic hassle of cutting a slice of cake.


It was a wise decision. These are the most moist, scrumptious bites of carrot cake I've had in a while, chock-full of juicy raisins and ever-so-slightly chewy strands of carrot. A-plus, as far as I'm concerned! They came out so scrummy and dainty that I decided not to ice them as the recipe suggested (though that orange cream cheese butter-cream sounds mighty tasty!) Instead, I christened them "mini-muffins" and left them as is: adorable, dainty, and a teensy bit healthier!

Recipe:
Carrot Cake Muffins
adapted from a recipe on goodtoknow.co.uk

1 1/8 cups plain flour
1 teaspoon baking soda
1 teaspoon cinnamon
1/4 teaspoon ginger
pinch of nutmeg
pinch of salt
2 eggs
1/2 cup caster sugar
1/2 cup vegetable oil
1/2 teaspoon vanilla extract
2 teaspoons fresh orange zest
2 1/4 cups grated carrot
1/2 cup raisins

Preheat the oven to 180º C (350º F)

Whisk together the flour, baking soda, spices and salt (or sift them if you have/want to use a sifter!) and set aside.

Crack the eggs into a large bowl and stir until they're creamy yellow and blended and then add the sugar, oil, vanilla and orange zest (I only had some tiny satsumas-- not the best zesting oranges-- so I used a couple and squeezed in a little bit of juice just for the heck of it). Blend thoroughly.

Now add the previously mixed dry ingredients, a little at a time, mixing thoroughly. The batter should be pretty stiff (good for the arm muscles!)

Add the grated carrot and raisins to the mix. The moisture in the carrots will loosen the batter up a bunch.

Spoon batter into cupcake-case lined muffin tins, about 2/3 full and pop into the preheated oven for about 25 minutes.


Sadly, this recipe doesn't make very many muffins (I only got 19) so I'll probably double it next time I make them (and yes, there will be a next time because they are yummy!) I also might try using light brown sugar instead of white, because it has a better flavor and the muffins came out looking pretty pale (not necessarily a bad thing, per se, but I think they could be cosmetically improved!)

A Tall Cool Drink: Lemon Iced Tea

Well, the sun is out with a fury, and that can only mean sunglasses, a good book, and a refreshing drink. Sipping something cool and fresh out of a tall glass while lounging in the sun, to me that epitomizes summer. I've been gradually working my way through War and Peace (hey, I have a lot of free time!) and flipping all those many, many pages can leave me feeling pretty parched... A quick rummage through the fridge this afternoon left me sadly disappointed. Not a tasty drink could be found! I decided I would just have to make my own.

This is my simple, eminently tweakable summer afternoon thirst-quencher...


Recipe:
Lemon Iced Tea
3 teabags
1/2 cup sugar
1/2 cup lemon juice

Pour two cups of boiling water over teabags in a pitcher and leave to steep for one hour. Remove the tea bags and add sugar and lemon juice. Stir until the sugar has dissolved and top up with four cups of cold water. Leave to chill in the fridge for an hour or so. Serve with slices of fresh lemon.

The amounts of lemon juice and sugar can be adjusted to suit personal tastes, just sample as you're mixing until it tastes perfect!


Sunday 20 May 2012

Southern Comfort on a Rainy Day: Sweet Potato Pie


So, yeah, it's not exactly anywhere near Thanksgiving. Heck, it's not even cold enough out that I can pretend. If only it would stop being grey and rainy it might even be like actual spring! Okay, maybe I'm being a little sulky about the weather we've been having around here lately. Wall-to-wall overcast and drizzle is not exactly pepping me up for a season of new growth and fresh veggies. At least the rain's good for all those gardens...

Well, I find that one thing that really helps with a miserable, soggy day is a oven-warmed kitchen and some appropriate wafting scents. Like nutmeg. And cinnamon. Two of the baker's best gifts, for which we should daily be grateful.

Flicking through my recipe pile, as I do in moments of boredom and/or procrastination, I happened upon the epitome of Southern Comfort Baking: the sweet potato pie. If there's any dish whose name I read in my head with a Southern accent, it's this one. As a true Northwestern Yankee, I rely on stereotype for most of my knowledge of the food of the Good Ole South. Sweet potatoes. Spices. Butter. Apart from crawdads, this one ticks all the boxes!

Before I start rambling about the joys of brown sugar and nutmeg, I have a confession to make: I cheated on the pie crust. I know it's kind of a sin for some people but I used a Krusteaz mix instead of struggling with awkwardly firm butter and easily over-worked dough. I've made pie crust before, honest. But today, sulking about the weather over a cup of tea, I just couldn't motivate myself to do it. Next time I make sweet potato pie (which may well be fairly soon, because this was tasty) I pinky promise that I'll make my own crust. I should hone my pastry skills!

Recipe:
Sweet Potato Pie
adapted from a recipe on allrecipes.com

2 cups mashed sweet potato (I used three medium-sized sweet potatoes)
1/4 cup unsalted butter
1 cup light brown sugar
1/2 teaspoon nutmeg
1 teaspoon cinnamon
1 teaspoon ginger
1/2 teaspoon salt
1 teaspoon vanilla extract
1 teaspoon lemon juice
2 eggs
1/2 cup evaporated milk
1 tablespoon flour
1 unbaked 9 inch pie crust


We begin with the humble sweet potato. A modest, unassuming root vegetable, often mistakenly called a "yam" in the U.S. (sadly, the topic of many a fierce debate between my father and myself. He prefers the waxy, yell0w-fleshed variety.) I believe that the sweet potato is testament to the fact that not everything that tastes fabulous and tummy-filling is waging a war on your cholesterol. Perhaps it is nature's apology for butter (I shake my fist at the sky in indignation for all of our waistlines)


Sweet potatoes are a little, largely under-appreciated gift-- something the Americas, if not America can be proud of (something I may well reassure myself with as the election campaigns get into full, soul-sucking swing). Unfortunately, these little guys are also very firm. This is a food that makes you wait while it takes its sweet time getting soft and delicious. It's worth it, believe me, but I, alas, am often impatient. That's what my microwave is for. The rotating plate thing doesn't really work and I'm not sure what half the buttons are for, but my microwave often comes to my rescue. Today, I chopped my root veg into large chunks and popped them in the microwave. I'm not sure how long it took-- at least fifteen minutes, with lots of pauses for flipping and rearrangement of chunks-- but when they were done, all steamy and oozing juices, the skin peeled away like a dream. I soothed all my impatient nerves with some zen-like mashing and stirring in butter that melted in the warm potatoes, letting off a lovely rich smell.

Zen-like trances aside, after I'd mashed up my sweet potatoes and added the butter, I simply added all the other ingredients, one at a time, making sure to mix them thoroughly so the mixture was smooth and lump-free. I was a little concerned that there might be a bit too much sugar in the mix, it tasted very sweet before I added the evaporated milk and even though it didn't stand out so much afterwards, I'll probably cut it down to 3/4 cup or so next time. The spicing could probably be increased a bit, as well (a little more cinnamon and ginger, at least, wouldn't hurt anybody!)


I didn't end up with the most attractive of results (my crimping techniques need some serious practice) but the taste is really what I care about for my first ever sweet potato pie. And I think it delivered. I almost went back for seconds.


But moderation is good, too. Sometimes...


Saturday 19 May 2012

Feta, Spinach and Zucchini Pasta Salad

I really love vegetables. Really, really love them. The colors, the freshness, the crunch, the flavors. Carbs and meat seem to fall on the same beige-to-brown spectrum. As mouth-watering as a juicy (brown) steak might be, a dash of veggie color and crunch really livens up a meal. Plus, that old health thing...

Well, my fridge is stocked to bursting with leafy green and other crunchy colors (I might have gone a bit bonkers in the produce aisle) so today's lunch was a well-vegetated pasta salad.

Garlic is another one of those beautiful little things that elevate the process of eating from quite nice to spectacular. So tiny and innocuous, with just a couple minutes in the frying pan it's sending off mouth-watering aromas, ready to latch onto whatever else you plan on throwing into the pan.


I know some people are bothered by the garlicky smell that stays on your hands after you've chopped it up (and on your breath after eating it!) but I don't mind if my hands smell like garlic. It's such an evocative kitchen-y kind of scent that immediately makes me think of olive oil and frying pans. Garlic is the gold to my frankincense and myrrh (and these are the other two right down here: feta and sun-dried tomatoes, honestly where would the Mediterranean be without them?)


 I find the way these flavors blend together to be almost therapeutic. They're so perfect, so balanced, and they make you savor every single mouthful.


 And continuing on the theme of my obsessive love for vegetables: don't you love how vibrantly green broccoli turns as it cooks? You think it looks all fresh and bright when you first pick up a head of it and then, when you cook it, this amazing deep color is released. It's as if the vegetable is hiding the really big finale for right before you put it in your mouth. Bravo, broccoli, encore!


I always pile in spinach by the handful, and every time I'm shocked and a tiny bit delighted by how much it reduces. The green edges of thinly sliced zucchini curl in the heat of the frying pan and the spinach softens and turns a deeper, darker green. Mm, perfection!


Adding the feta and the pasta brightens everything up. Incidentally, turning the dish into the Italian Flag. Awesome.


To be honest, as much as I blabber about savoring every mouthful, I was pretty hungry and this fella didn't last very long. Just long enough for me to snap a few pictures and then, all gobbled up!


This is a fairly basic, throwing-stuff-in-the-frying-pan deal, but I'll include a recipe anyway. Just because.

Recipe:
Vegetable and Feta Pasta Salad

a handful of pasta
1/2 large zucchini, thinly sliced
a handful of chopped broccoli
3 sun-dried tomatoes, roughly chopped
2 cloves of garlic, minced
a couple of large handfuls of spinach
a chunk of feta (as much or as little as you want!)
olive oil
black pepper for seasoning

Put the pasta on to cook in lightly salted water.
Saute the sliced zucchini and broccoli in a large frying pan until tender. Season with pepper to taste. When the veggies are almost done, add the minced garlic and sun-dried tomatoes. When the pasta is just about finished, add the spinach, moving all the veggies around regularly until the heat has reduced the spinach. Remove from the heat. Now drain the pasta and stir it in. Add crumbled feta and serve while hot!

Friday 18 May 2012

A Personal Touch: Homemade Pizza


As a student, I've had my fair share of take-out pizzas. Domino's and Pizza Hut are the go-to study aids or post-exam rewards (sometimes both for one exam... Hello, Freshman 15!). It's not fabulous (especially once it's gone a bit lukewarm and congeally) but sometimes nothing beats simply calling a number or even just going online (ah, modern times!) and, within an hour, having food-- steaming and ready to be tucked into-- delivered straight to your door. Even if the delivery guy does judge you because he delivered to the same address last week and you're still wearing your pajamas.

That being said (perhaps not proudly, but at least without shame) Pizza Hut doesn't hold a candle to home made. Yeasty and warm and covered with all you favorite toppings in just the right proportions. Could there really be a better argument for cooking for yourself?


When a lot of my friends moved out of their parents homes they had that college-age-independence realization that, suddenly, they could actually eat whatever the heck they wanted! As long as their wallets could stretch far enough and their livers/cholesterol/rationality didn't lodge a formal protest, the gastronomic world was their oyster.

Me, on the other hand, I discovered that I could cook whatever the heck I wanted. I could spice it/fry it/roast it/douse it in whatever concoction I chose. And to me, pizza is the ultimate I Did It My Way meal. Homemade pizza parties with my housemates involve everyone getting their own personal sized pizza to top with whatever crazy combination of tastiness they have a craving for (as long as it's in the cupboard/fridge!) Interactive and individually crafted just for you. It doesn't get better than that! Oh, and did I mention how cheap it is? Very cheap. Domino's, you so sneaky!

Recipe:
Really Simple Pizza Dough

1 1/2 cups flour
1 teaspoon salt
1/4 teaspoon sugar
2 1/4 teaspoons yeast
warm water
1/4 teaspoon sugar
1 tablespoon Extra Virgin olive oil

Activate the yeast by mixing it with 1/4 teaspoon of sugar in a cup of warm water. Set it aside until it gets frothy (5-10 minutes)

Whisk together the flour, salt and other 1/4 teaspoon of sugar.

Make a well in the center of the flour mix with a wooden spoon and pour in the olive oil and a little bit of the water/yeast mix. Start stirring, adding a little bit of water at a time until you've formed a dough. All the flour should be incorporated but it shouldn't be so sticky that you can't pick it up without getting a layer of dough stuck to your hands!

On a lightly floured surface knead the dough by folding it over on itself and pressing it flat with the heels of your hands. Knead until the dough is elastic and has a slightly stick exterior (a couple of minutes).

Put the dough in a clean bowl, covered with cling film, in a warm place (or at least somewhere that's not freezing like my kitchen is!) and let it rise for about an hour. It should double it's size.

When you're ready to make the pizza, turn the dough out on a lightly floured surface and knead it a couple times to get out some of the air (so you don't get giant bubbles that look like pizza-blisters when you bake it!) Then form it into a ball and flatten it out (with a rolling pin or with your hands and much tossing in the air, a la pizzeria!) At the risk of the stating the obvious, if you roll the dough out thinner, you'll get a thinner, crispier crust, whereas if you leave it thicker, the crust will puff up and you'll get more of an American-style thick crust.


Crank your oven up to 200º C (400º F)

Now go to town. Throw whatever you're in the mood for on that bad boy! Cheese, tomato sauce, veggies, meat, seafood. The possibilities are mind-boggling and endless. I usually go for a simple veggies-and-cheese affair. Tomato puree is my go-to pizza sauce (because I am cheap and frequently lazy). I spread it on the dough with the back of a spoon and then sprinkle a healthy pinch of dried oregano and basil. I'm a huge fan of spinach so I always cram in as much of it as possible, putting it underneath all the other toppings since it tends to  get all charred and crispy in the oven otherwise.


Depending on how thick you've rolled the crust and how high you've piled the toppings it can take between 10 and 15 minutes to bake. (Also, it depends on how crispy or doughy you like your pizza!)


Oops, that's not a pizza! It's a calzone, but it was made using the same pizza dough recipe (because a calzone is really just a more portable pizza!)

Buon appetito!

Wednesday 16 May 2012

The Cupboard of Hoarding: Ginger Muffins


This food adventure starts with cleaning. And with treacle. By no means one of the worst combinations I can think of.

I’ll be graduating this year, which means, in addition to sorting out that terrifying specter haunting most twenty-somethings, the future, that I will have to move out of my student house and ship my life in three suitcases or less back to the other side of the world (yes, moving back in with the parents, how glamorous!) I’ve decided to put off the many stress-inducing aspects of this imminent schlep by focusing on the kitchen. Ah, that shrine of godly splendor wherein I have spent many an hour (and procrastinated before many a deadline)!

Over the two years or so that I’ve been living in this house, I’ve accumulated a lot of tid-bits—various spices, little plastic bags of ground almonds, bonito flakes, and turmeric, bottles of food-coloring, Tabasco, and almond extract. Luxury items for the occasional baking extravaganza, now sitting sad and unused on the top shelf. Most of them were probably more substantial when I bought them, but after a few uses I’m left with an array of uselessly small amounts of clashing ingredients, the makings of a truly terrifying Everything Bagel.

It was while surveying this clutter of packaging and precariously stacked containers that I made a Resolution. Before I leave I will use up every package of food-stuffs that I find tucked away in this Cupboard of Hoarding. Everything. No throwing away, that’s not in the spirit of student-hood, the creed I will still be living by for the next two months. Panicked (and well-stocked with deadlines to procrastinate for) I set off on a frantic cycle of chain baking. Chocolate chip cookies, toasted almond cookies, double chocolate biscuits, devilish fudgy brownies, and a very sexy pumpkin pie (ingredients imported all the way across the pond from America). Whew. It’s addictive! After two years of gradually collecting and hoarding cook’s treats and bakeware, I’d finally caught the bug, two months away from D-Day, the big move.


Well, so much the better. At least this way the Resolution won’t suffer the same fate as all those New Year’s promises (I’m looking at you, “Eat Less”, “Exercise More” and “Be Nicer to People”. Whatever happened to you, eh?) With the Baking Bug, my decision to use up and clear out could become an exciting adventure. Something Fun and Exciting. Resulting in lots of things to force my housemates to eat (or rather, to tempt them with, bribery to gain their affections!)

Pepped up with determination and itchy baking fingers, I resolved to tackle a little tin that had been taunting me since early December, lurking like a little gremlin of sticky seasonal flavoring. Treacle. Now, I am not generally one to be put off by ingredients, nor by the potential for mess (and treacle has a LOT of potential for that). The Treacle Gremlin so intimidated me because it stood as a reminder of the Baking Disaster of December 2011. An attempt to make ginger snaps that went horribly, horribly wrong. A gooey heap of deliciously-gingery scented ooze, seeping clarified butter in a slippery, sliding mess. The part that didn’t end up cemented to the bottom of the oven, that is. For the next few months, despite attempts to scrub, soak, and pry the burnt remains off the over floor, every time someone used the oven to heat up a frozen pizza or chicken fingers, the whole house was filled the Christmas-y fragrance of ginger and treacle. Perhaps not the most unpleasant result but nonetheless a failure.

Armed with resolutions and pep, I decided that the time had come to face the Treacle Gremlin yet again. Coming across my used-but-one-time silicone muffin cups, I decided to resurrect the ginger ghost, this time in muffin form (less opportunity for spillage, more potential for uniformly shaped and sized treats, genius!)

This was the result…


Recipe:
Ginger Muffins
(modified from a recipe found on allrecipes.com)

113 grams unsalted butter (1/2 cup)
1/2 cup caster sugar
1/2 cup brown sugar
2 eggs
l cup black treacle
3 cups self-raising flour
2 teaspoons cinnamon
1 teaspoon ginger
½ teaspoon nutmeg
1 teaspoon baking soda
½ teaspoon salt
1 cup sour milk (add one tsp of lemon juice to 1 cup of milk and let it sit while you mix the other ingredients, it should curdle slightly by the time you’re ready to add it in)
Extra sugar for sprinkling (optional)

Preheat oven to 180° C (350° F).

Mix flour, spices and salt and set aside.
Cream butter and sugar until smooth and then add eggs and treacle.
Add flour mixture and milk a bit at a time, alternating between the two. Mix until just combined, not thoroughly blended.

Spoon batter into muffin tins/cups, filling each cup halfway (they rise quite a bit in the oven). If you’re not using paper cups in your tins, be sure to lightly grease them so it’s easier to remove the cooked muffins.

If you want, you can sprinkle a little granulated sugar on the top of each muffin before baking. It gives them a nice little accent when they’re done but isn’t necessary for the taste.

180° Celsius (or 350° Fahrenheit)
16 minutes or until a toothpick inserted in a muffin comes away clean (my muffins were quite small, with larger ones you might need a couple extra minutes)

I ended up with 47 (small) muffins.


These aren’t overwhelmingly gingery or treacle-ish but have a delicately spiced flavoring that’s perfect for a little afternoon snack (I like mine with a nice cuppa!)


When they first came out of the oven (after cooling enough to not burn the roof of my mouth!) they had a lovely crunch to their tops and were soft and fluffy on the inside. After cooling completely (and spending a night in a plastic bag) they developed that sticky glaze that muffins often get (which I personally love!)

Apart from being tiny and adorable, these are also pretty flexible. I added a handful of raisins to the final batch (another find from the back of The Cupboard) and it added a lovely extra texture and flavor element. You could definitely experiment with adding various other additions and adjust the spicing for personal tastes. A lovely fluffy, bite-sized template for personal tweaking!